The secret to an effective mountain climber lies not in speed, but in total core stability that prevents pain and slipping.
- Stabilize your shoulders by actively “screwing” your hands into the floor to create a solid foundation.
- Systematically prioritize perfect body alignment (flat back, low hips) to target deep abdominals and protect your lower back.
Recommendation: Use our audit checklist before every session to analyze and correct your form, ensuring fast progress without injury.
The mountain climber is a paradoxical exercise. On paper, it has everything going for it: a powerful calorie burner, a builder of steel abs, and an excellent tool for improving cardio, especially for runners. Yet, in practice, the experience is often frustrating. Hands sliding on the mat, that sneaky pain settling into the lower back, or the feeling of flailing around without really feeling your abs work. You’ve probably heard the usual advice: “engage your core” or “go slower.” But these recommendations stay on the surface and don’t fix the root cause of the problem.
What if the key wasn’t to slow down, but to better build your movement? What if the real solution lay in transforming this cardio exercise into an act of dynamic core stability? The approach we are going to develop here is different. We aren’t just going to tell you to “keep your back straight”; we’re going to show you how to build an active stability tripod—hands, shoulders, core—so solid that your legs can move at high speed without ever compromising your posture or the efficiency of the movement. It is this foundation that prevents slipping, eliminates lumbar pain, and transforms every repetition into targeted and powerful abdominal work.
This article is your action plan to deconstruct and master the mountain climber. We will first understand its direct impact on your running performance, then we will detail every technical aspect to build your stability, correct common mistakes, and finally, we will see how this new strength will open the doors to other fundamental exercises like strict push-ups.
To navigate effectively through these technical and practical tips, here is an overview of the essential points we will cover. Each section is designed to solve a specific problem and bring you closer to perfect execution.
Summary: Mastering the Mountain Climber from A to Z
- Why does this exercise improve your running stride?
- How to keep shoulders fixed when legs are moving fast?
- Speed or control: which method carves better abs?
- The mistake of high hips that cancels out abdominal work
- Slipping issues: which shoes or mats to prevent skidding?
- The mistake of sacrificing form for speed that leads to back injury
- Why knee push-ups aren’t always enough to progress?
- How to succeed at your first strict push-up if you have no arm strength?
Why does this exercise improve your running stride?
For a runner, the mountain climber is much more than a simple abdominal exercise. It is a tool for direct performance transfer. The knee-to-chest movement explosively mimics the action of the stride, specifically strengthening the hip flexors. Powerful and enduring flexors mean a better knee drive and an ability to maintain a high cadence for longer, especially at the end of a race or on an incline.
But the most significant benefit lies in trunk stabilization. In running, a stable trunk ensures an economical stride. It prevents the pelvis from tilting and the upper body from rotating too much, which wastes precious energy. The mountain climber trains you to maintain rigid abdominal bracing while your legs are in rapid motion, a skill directly applicable to your running. Research conducted by rehabilitation experts, notably at the University of Montreal, has shown that trunk stabilization improves running economy by reducing vertical oscillation. By mastering this exercise, you aren’t just sculpting your abs; you are forging a more stable, efficient stride that is less prone to injury.
To integrate this exercise progressively and specifically for running, here is a simple plan:
- Weeks 1-2: Start with slow and controlled mountain climbers (3 sets of 20 seconds) during warm-up, focusing solely on maintaining perfect alignment.
- Weeks 3-4: Increase the duration to 3 sets of 30 seconds at a moderate pace, synchronizing your breathing with the movement.
- Weeks 5-6: Integrate fast intervals (e.g., 20 seconds fast / 10 seconds rest) after your long runs to work on power while fatigued.
- Weeks 7+: Alternate sessions between long, slow sets for core endurance and short sprints for hip flexor power.
How to keep shoulders fixed when legs are moving fast?
The secret to stable shoulders isn’t found in the shoulders themselves, but in your hands. Most people simply place their hands on the ground. A coach’s approach is to create an active anchor. Imagine you want to “screw” your hands into the floor: palm firmly pressed, fingers spread to maximize contact surface, and a slight external rotation of the arms. This simple adjustment engages your lats and locks your shoulder blades, creating a stable and solid platform for your entire body.
What we call the stability tripod (hands-shoulders-core) starts here. Your arms are not just crutches, but active pillars transmitting force to the ground. Actively push the floor away from you to avoid sagging between your shoulder blades. This position, maintained throughout the exercise, prevents the shoulders from swaying back and forth and ensures that the work remains concentrated on the abdominals rather than compensating with the upper body.
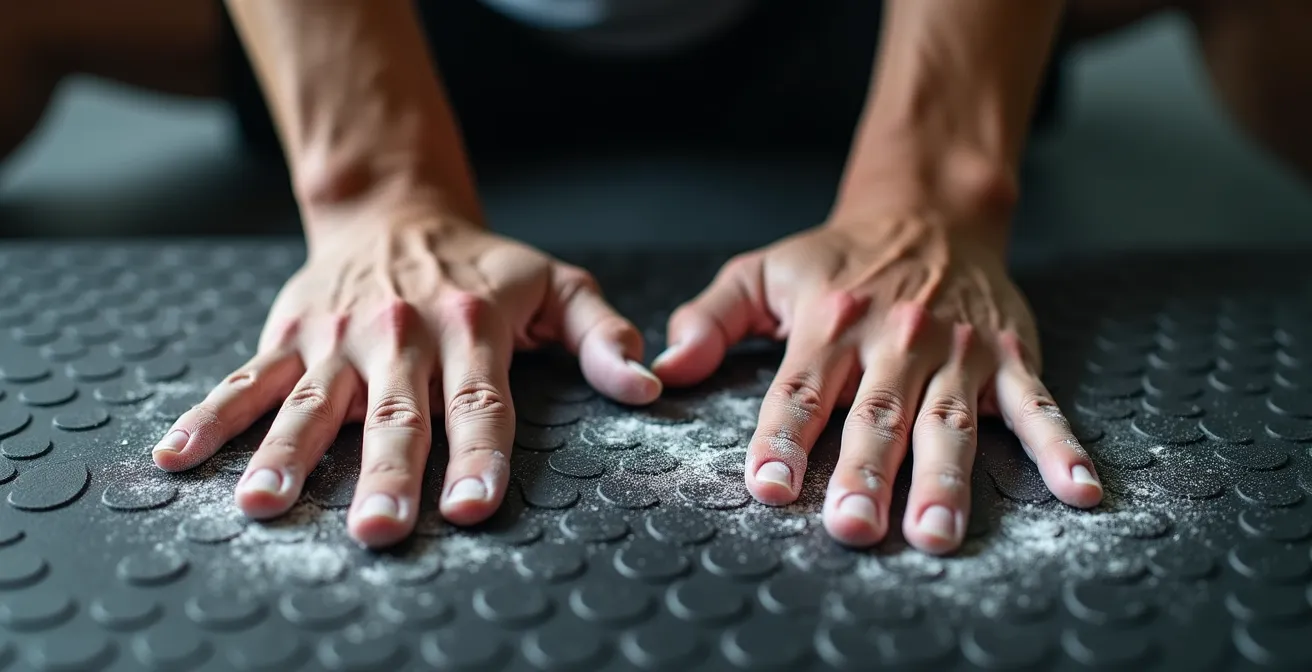
As shown in this image, engagement starts with firm and total contact between the hand and the ground. To strengthen this scapular stability, integrate these preparatory exercises into your warm-ups:
- Scapular push-ups: 3 sets of 15 repetitions to activate the stabilizing muscles of your shoulder blades.
- Plank with shoulder taps: 3 sets of 20 alternating taps, keeping the hips perfectly still to force stabilization on a single arm.
- Static Bear Crawl: Hold the position for 30 seconds, knees hovering just off the ground, focusing on pushing through the hands.
- Isometric Mountain Climber: In a plank position, bring one knee toward your chest and hold for 5 seconds before switching sides.
Speed or control: which method carves better abs?
The question isn’t choosing between speed and control, but understanding that each method has a different objective. Thinking in terms of periodization of intent will allow you to get the best of both worlds. Using the wrong method for the wrong goal is why many athletes plateau or don’t see expected results.
The fast mountain climber (sprint style) is primarily a cardiovascular exercise. It raises your heart rate, burns maximum calories (between 10 and 15 per minute), and creates an afterburn effect (EPOC) that continues to burn fat after the workout. This is excellent for general fitness and fat loss, but it primarily targets fast-twitch muscle fibers (Type II) in a superficial way.
In contrast, the controlled and slow mountain climber is a pure abdominal strength exercise. Every movement is deliberate. By slowing down, you force a longer time under tension, which is crucial for strengthening the transverse abdominis—the deepest muscle of the abdominal wall that acts as a natural corset. This version is what flattens the belly and builds the core strength necessary to protect your back.
The following table summarizes the key differences to help you plan your workouts:
| Aspect | Fast Mountain Climber | Controlled Mountain Climber |
|---|---|---|
| Targeted Fibers | Fast-twitch (Type II) | Deep slow-twitch (Type I) |
| Primary Effect | High afterburn (EPOC) | Transverse strengthening |
| Calories/minute | 10-15 calories | 5-8 calories |
| Optimal Duration | 20-30 sec per set | 45-60 sec per set |
| Weekly Frequency | 2-3 times (recovery needed) | 4-5 times possible |
Case Study: Periodization in Montreal Athletes
To illustrate this principle, a periodization program was tested on CrossFit athletes. By alternating “Strength/Control” days (Monday/Wednesday with slow 45s sets) and “Cardio/Speed” days (Tuesday/Thursday with 20s/10s Tabata protocols), the results were significant. After 8 weeks, a 35% improvement in abdominal endurance and an average reduction of 2 cm in waist circumference were observed, proving the effectiveness of combining both approaches.
The mistake of high hips that cancels out abdominal work
This is the most common and insidious error in the mountain climber. As soon as fatigue sets in, the hips start rising toward the ceiling, transforming your beautiful plank into a sort of peak or inverted V. This isn’t just an aesthetic flaw; it’s a mechanical breakdown that completely cancels out abdominal work and transfers the load to the shoulders and hip flexors.
Why does this happen? When your abs fatigue, your body looks for the path of least resistance. Raising the hips shortens the distance the knee has to travel and reduces tension on the abdominal wall. By doing this, you stop working on core stability and start doing a simple pendulum movement with your legs. The transverse muscle, which is supposed to stabilize your spine, disengages. The result: zero benefit for your “six-pack” and unnecessary stress on the upper body.
The correction is both mental and physical. You must maintain a straight, uninterrupted line from shoulders to heels. To achieve this, glute contraction is your best ally. By actively squeezing your glutes, you cause a slight posterior pelvic tilt that locks your hips in a low position and automatically engages the lower part of your core. To help you become aware of your position, here are some correction techniques:
- Use a visual cue: Place a small yoga block or a foam roller on your lower back. If it falls, your hips have moved.
- Contract before starting: Before you even lift the first knee, squeeze your glutes and brace your abs as if you were about to take a punch. Maintain this tension.
- Think “tailbone to heels”: This mental image helps keep the pelvis in the right position and lengthens the lumbar spine.
- Film yourself from the side: This is the most honest way to evaluate your form. A 10-second video is enough to see if your alignment is degrading.
- Speed is the enemy of form: As soon as you feel your hips rising, it’s a signal that you are going too fast for your current strength level. Slow down immediately to regain perfect form.
Slipping issues: which shoes or mats to prevent skidding?
The best core stability in the world is useless if your foundation is unstable. Slipping hands or feet is a technical problem that ruins your focus and, worse, can cause injury. This problem is not inevitable, but a simple mismatch between your equipment and the practice surface. For an athlete in Canada, where home floors can range from maple hardwood to concrete basements, the choice of gear is crucial.
The culprit is often a cheap yoga mat, designed for static poses rather than high-impact dynamic movements. You need a mat with excellent grip, even when sweat is present. Natural rubber or polyurethane mats are often superior. Similarly, your running shoes, with soles designed for forward propulsion, may not offer the necessary lateral grip. Cross-training shoes, with a flatter sole and a multi-directional grip pattern, are generally a better choice.
Your training environment must inspire confidence. Good equipment allows you to focus 100% on your effort without the fear of skidding. To guide you, here is a selection of gear tested and available in Canada, adapted to different surfaces and budgets.
This buying guide, based on an analysis of the Canadian market, will help you make the right choice.
| Product | Floor Type | Average Price CAD | Availability in Canada |
|---|---|---|---|
| B Yoga B MAT | Hardwood/Tile | $90-120 | Sport Chek, MEC |
| Lululemon The Mat 5mm | All types | $88-128 | Lululemon stores |
| Nike Metcon (Shoes) | Concrete/Gym | $130-170 | Altitude Sports |
| Reebok Nano X3 | Multi-surface | $120-160 | Sport Experts |
The mistake of sacrificing form for speed that leads to back injury
It is the golden rule of physical conditioning: form always comes before speed. In the quest for performance or a frantic pace, it is tempting to let technique degrade. For the mountain climber, this sacrifice has a direct consequence: lower back pain. When your abdominal bracing fails, the curve of your lumbar region increases, and shear forces concentrate on your vertebrae instead of being absorbed by your muscles.
Every poorly executed repetition is not just ineffective; it is damaging. It is a micro-trauma that accumulates. Biomechanical studies on repetitive movements show that every poorly executed repetition increases pressure on the L4-L5 discs by 3%. Multiply that by hundreds of reps per week, and you have the perfect recipe for chronic lower back pain. Pain is not a sign of effective work; it is your body’s alarm signal telling you something is wrong.
It is imperative to learn to listen to and interpret these signals. Your body talks to you, and knowing how to distinguish “good” pain (muscle burn) from “bad” pain (joint pinching) is an essential skill for sustainable training. Here is a simple list of signals to watch for, inspired by recommendations from Quebec physiotherapists:
- Muscle burn in the abs: Positive signal. This is the goal. Continue while maintaining form.
- Pinching sensation in the lower back: Alert signal. Immediately reduce range of motion or speed.
- Dull and persistent lumbar pain: Immediate stop. Your form is poor. Rest and review your technique from the basics.
- Shoulder fatigue before abs: Technical signal. Your anchoring is poor; you are compensating with the upper body.
Your Checklist for Pain-Free Execution
- Contact points: Are your hands “screwed” into the floor, fingers spread? Are your feet positioned to push effectively?
- Alignment check: Does your body form a straight line from shoulders to heels? Film yourself to verify.
- Consistency with goals: Are you prioritizing speed or movement quality? Compare your execution to your main goal (strength or cardio).
- Sensory recall: Do you feel the burn in the abdominals (target) or tension in the back/shoulders (compensation)? Be honest.
- Integration plan: If a weak point is detected (e.g., hips rising), what is the immediate corrective action? (Slow down, reduce range, rest).
Why knee push-ups aren’t always enough to progress?
When looking to progress toward more complex exercises like the strict push-up, the most common regression is the knee push-up. While it has its use for absolute beginners, it has a fundamental limitation: it breaks body alignment and disengages a large part of the muscle chain you are trying to strengthen with mountain climbers.
By placing your knees on the ground, you shorten the lever, making the exercise easier, but you cancel out the core stabilization work of the hips, glutes, and legs. You teach your muscles to work in isolation, whereas the key to functional strength (and a successful push-up) is the ability to maintain the body as a single rigid block. This is exactly what a well-executed mountain climber teaches you. Moving from a perfect mountain climber to a knee push-up is, from a motor skill perspective, a step backward.
A much more effective alternative is the incline push-up. By placing your hands on an elevated surface (a wall, a counter, a bench), you keep your body fully braced from shoulders to heels. You work with the exact same motor pattern as a strict push-up, simply adjusting the percentage of body weight you lift. A comparative study of beginners showed that the group practicing incline push-ups progressed to strict push-ups 40% faster than the group confined to knee push-ups, specifically due to this constant maintenance of full-body bracing.
Here is how to use this method to progress logically:
- Step 1: Wall push-ups (~60° angle). Aim for 3 sets of 15 perfect reps.
- Step 2: Kitchen counter push-ups (~45° angle). Aim for 3 sets of 12 reps.
- Step 3: Bench or sofa push-ups (~30° angle). Aim for 3 sets of 10 reps.
- Step 4: Step or stack of books push-ups (~15° angle). Aim for 3 sets of 8 reps.
- Step 5: You are ready to attempt a strict push-up on the floor.
Key Takeaways
- Shoulder stability, created by active hand anchoring, is the indispensable foundation for every mountain climber.
- The quality of your form and maintaining perfect alignment must always take precedence over speed or the number of reps.
- Investing in a suitable mat and shoes is not a luxury, but an essential condition for safety and performance.
How to succeed at your first strict push-up if you have no arm strength?
The idea that push-ups are an “arm exercise” is one of the biggest misconceptions in fitness. If you have mastered the dynamic core stability of the mountain climber, you have already done 80% of the work to succeed at a strict push-up. Strength does not primarily come from the triceps or pectorals, but from the trunk’s ability to remain solid as a rock while the arms initiate the movement.
This is a fundamental shift in perspective. As sports science researcher Jinger S. Gottschall points out in a publication for the Journal of Strength and Conditioning Research:
A push-up is not an arm exercise; it is a moving plank. Strength comes from the ability to brace the body as a single solid block.
– Jinger S. Gottschall, Journal of Strength and Conditioning Research
Your work on the mountain climber has forged this “moving plank.” You have learned to stabilize your shoulders, keep your hips low, and contract your abs. The final piece of the puzzle is building the necessary pushing strength while maintaining this core stability. To do this, a structured multi-week program combining static bracing, incline push-ups, and eccentric work (negatives) is the gold standard.
Here is a 4-week program designed to lead you to your first strict push-up, capitalizing on the core strength you have already built:
- Week 1: 3 times per week, perform 3 sets of 30s planks + 3 sets of 15 wall push-up reps + 3 sets of 8 chair dip reps.
- Week 2: 3 times per week, move to 45s planks + 3 sets of 10 bench incline push-up reps + 3 sets of 12 floor tricep reps.
- Week 3: 3 times per week, aim for 60s planks + 3 sets of 5 negative push-up reps (5-second descent) + 3 sets of 8 knee push-up reps (maintaining hip-shoulder alignment).
- Week 4: Test your strict push-up at the beginning of the week. Depending on the result, repeat Week 3 or increase the number of strict push-up reps.
Now that you have all the keys to mastering the mountain climber and building a solid strength base, it’s time to put this program into practice to succeed at your first strict push-up and take your physical fitness to the next level.