The key to pain-free knees isn’t avoiding lunges, but choosing the right variation (the reverse lunge) and correcting your technique from A to Z.
- Reverse lunges are biomechanically safer because they reduce pressure on the kneecap by encouraging a hip hinge.
- Stability doesn’t come from brute force, but from a “tripod foot” firmly anchored to the ground and constant abdominal bracing to neutralize the pelvis.
Recommendation: Always start with static lunges at a reduced range of motion to master form before even considering walking or weighted lunges.
For any runner or hiker, the dilemma is familiar: you know that strong legs are the key to performance and injury prevention, but every attempt at a lunge results in that nagging knee pain. You’ve been told the usual advice: “don’t let the knee pass the toes,” “keep your back straight.” Yet, suspicion sets in, and you eventually give up on this fundamental exercise.
Leg strengthening for an endurance athlete is part of a complex ecosystem. It’s not just about quadriceps and hamstrings. Core stability, hip health, and even your choice of running shoes on Canadian trails form a kinetic chain where every link counts. A weakness in one area inevitably resonates elsewhere, and the knee, caught between the ankle and the hip, is often the one that pays the price.
What if the real question wasn’t a simple binary choice between forward and reverse lunges? What if the pain was a symptom of a deeper imbalance, an alignment flaw that, once corrected, would transform the lunge into your best ally? The solution lies not in avoidance, but in mastering a corrective protocol that realigns the entire chain, from the foot to the pelvis, to finally offload your knee joint.
This article will guide you through this protocol. We will start by identifying the source of imbalances that radiate up to the back, then break down the technique of the perfect lunge, from the ground up. Finally, we will address equipment choices and complementary exercises to build a solid and lasting foundation for your knees.
Table of Contents: The Complete Protocol for Safe and Effective Lunges
- Why having one leg stronger than the other causes your back pain?
- How to keep your balance during lunges without wobbling like a beginner?
- Walking vs. static lunges: which version burns more calories?
- The front foot positioning error that shears your joint
- Flat glute problem: how to modify the lunge for better activation?
- The invisible error of knees caving in that destroys your ligaments
- Minimalist vs. cushioned shoes: which ones truly protect your knees?
- How to do Mountain Climbers without slipping or hurting your lower back?
Why having one leg stronger than the other causes your back pain?
That dull pain in your lower back after a long run or hike might not be a coincidence. It is often the alarm cry of a deep muscular imbalance. In Canada, the problem is so widespread that according to compiled data, nearly 80% of Canadian adults will suffer from at least one episode of back pain in their lifetime. For many endurance athletes, the origin of this pain is not in the back itself, but much lower: in the pelvis.
This phenomenon is often described as Lower Cross Syndrome. Imagine an “X” drawn across your pelvis: on one side, the hip flexors (often shortened by sitting) and the lower back muscles become overactive and tight. On the other side, the deep abdominal muscles and, especially, the gluteus maximus, become lazy and underutilized. This imbalance causes the pelvis to tilt forward, creating excessive lumbar curvature (hyperlordosis) that places continuous pressure on your vertebrae.
Case Study: The Vicious Cycle of Lower Cross Syndrome
Lower Cross Syndrome perfectly illustrates how a muscular imbalance in the pelvis and hips can cause back pain. The thoracolumbar extensors and hip flexors become chronically tight, tilting the pelvis forward and creating lumbar hyperlordosis. Meanwhile, the abdominals and gluteus maximus become inactive, creating this imaginary “X” of imbalances that generates chronic lower back pain. Unilateral work like the lunge is essential for waking up the dormant side.
This imbalance is rarely symmetrical, leading to one leg being functionally “stronger” or more dominant than the other. The body compensates, but these compensations come at a cost. In Quebec alone, the cost of compensation for work leave related to back pain represents 650 million dollars per year. Unilateral exercises like lunges are specifically designed to break this cycle by forcing each leg to work independently, thereby exposing and correcting weaknesses.
How to keep your balance during lunges without wobbling like a beginner?
That feeling of wobbling, where the ankle seems like it wants to give way at any moment, is the main barrier to correct lunge execution. Many think it’s a lack of strength, but it’s primarily a deficit in proprioception: your body’s ability to locate itself in space. The solution is found at the very base of your movement: your foot.
Forget the idea of simply “placing” your foot. You must build it like a stable tripod. The “tripod foot” technique consists of actively distributing your weight across three fundamental support points: the base of the big toe, the base of the small toe, and the center of the heel. By consciously creating this anchor, you activate the plantar arch and send a stability signal up the entire kinetic chain: ankle, knee, and hip.
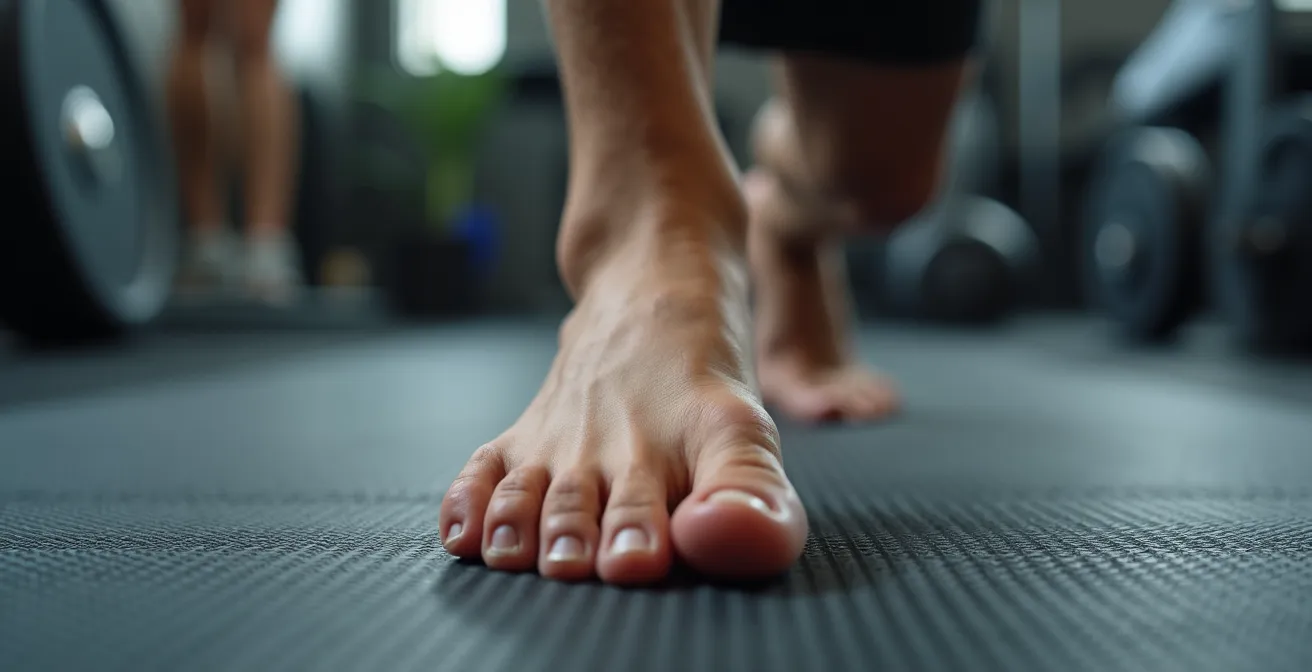
As seen in this image, creating a solid base is the first non-negotiable step. Once this tripod is established, the rest of the body can organize around this stable axis, transforming a precarious exercise into a controlled and powerful movement. This is the secret to moving from passive, fragile balance to active, intentional stability.
Your Action Plan: Mastering Balance in 5 Steps
- Initial Position: Start with the rear knee on the ground, directly under your hip, to establish a stable reference base.
- Front Foot Placement: Move the front foot forward until the heel is under the knee, forming a 90-degree angle. Ensure the foot points straight ahead.
- Tripod Anchoring: Spread your toes and actively press the three support points (base of the big toe, small toe, and heel) into the ground.
- Posture and Bracing: Lengthen your spine, engage your abdominals as if pulling your belly button in, and fix your gaze on a point straight ahead to stabilize your vision.
- Controlled Ascent: Push off the toes of the back foot and drive through the front heel to rise vertically, keeping the trunk upright and the pelvis neutral.
Walking vs. static lunges: which version burns more calories?
Once stability is acquired, the question of progression arises. Walking lunges—dynamic and intense—seem like the logical next step to increase calorie expenditure and simulate the running motion. However, for a fragile knee, this isn’t always the best initial choice. The absolute priority must remain movement control and quality, not the number of calories burned.
The following comparison table, based on an analysis of different lunge variations, highlights the advantages and disadvantages of each approach, specifically for someone concerned about knee health.
| Criteria | Static Lunges | Walking Lunges |
|---|---|---|
| Calorie Expenditure | Moderate (6-8 cal/min) | High (8-12 cal/min) |
| Movement Control | Excellent – fixed position | Difficult – constant displacement |
| Safety for Fragile Knees | Optimal – controlled load | Risky if execution is poor |
| Imbalance Correction | Ideal – precise unilateral work | Less effective – rapid alternation |
| Rehabilitation Phase | Recommended | Not recommended initially |
| Outdoor Activity Prep | Technical foundation | Direct functional transfer |
The data is clear: while walking lunges burn more calories, they require technical mastery that can only be acquired with static lunges. For a runner in a strengthening or rehab phase, starting with the static version allows for focus on alignment, glute activation, and knee stability without the added complexity of movement.
For sensitive knees, prioritize a progressive range of motion. Start with shallow lunges and increase depth as your strength and mobility improve.
– Experts from My15MinuteChallenge, Complete Lunge Guide 2025
The front foot positioning error that shears your joint
The most common gym advice, “never let your knee pass your toes,” is actually an oversimplification that masks the true danger. The problem isn’t so much the knee’s forward travel as the weight distribution on the front foot. The critical error that puts immense pressure on the patellar tendon is letting the front heel lift, transferring the entire load to the forefoot.
Biomechanical Analysis: The Real Culprit of Knee Pain
A biomechanical analysis of the lunge reveals that the real danger is not the knee passing the toes, but weight distribution too far forward on the foot, causing the heel to lift. This error puts enormous pressure on the patellar tendon. Reverse lunges are particularly recommended for people with knee pain because they promote a hip hinge movement that naturally moves the load away from the kneecap, unlike forward lunges which increase this pressure by encouraging forward momentum.
This is where the choice between forward and reverse lunges becomes crucial. The forward lunge encourages forward and downward movement, increasing the risk of loading the kneecap. The reverse lunge, on the other hand, favors backward movement and hip flexion. This simple change in direction naturally prompts you to keep the weight in the heel of the front foot and use the glutes and hamstrings as the primary drivers, thereby offloading the knee joint.
The goal is to maintain an alignment where the shin of the front leg remains as vertical as possible, with the knee positioned directly above the ankle. The reverse lunge makes this alignment much more intuitive and safer for fragile joints.
Flat glute problem: how to modify the lunge for better activation?
Opting for the reverse lunge is an excellent first step. However, for it to be truly effective and protective, you must ensure the right muscles are working. A common problem, even with seemingly correct form, is “gluteal amnesia”: the quads and lower back take over, while the strongest muscle in the body remains underutilized.
To transform the lunge into a top-tier glute-building exercise, simply doing the movement isn’t enough; you need intent. By slightly modifying posture and focusing on the neuromuscular connection, you can radically change the targeted muscles. The key is to create a greater stretch of the gluteus maximus in the bottom position to trigger a more powerful contraction on the way up.
The following protocol breaks down the technical adjustments needed to ensure your glutes are the main actors in the movement:
- Targeted Pre-activation: Before even starting your lunges, wake up your glutes with 10 to 15 reps of “clamshells” or “hip bridges,” ideally with a resistance band above the knees to feel the contraction.
- Torso Lean: Instead of keeping the chest perfectly upright, lean it slightly forward (about 15-20 degrees) while maintaining a flat back. This lean pre-stretches the glute of the front leg.
- Focus on the Hip Hinge: Think about “sitting your hip back” as you descend, rather than simply “bending the knee.” This hip hinge movement maximizes the glute stretch.
- Heel Drive: During the ascent, focus all your intention on pushing the ground away with the heel of your front foot. Consciously contract the glute of that leg to initiate the climb.
- Tempo Control: Slow the movement down. Aim for a 3-second controlled descent, a 1-second pause at the bottom to feel the stretch, and an explosive but controlled 2-second ascent.
The invisible error of knees caving in that destroys your ligaments
You can have perfect posture and good glute activation, but a subtle and devastating error can still sabotage your efforts: dynamic knee valgus. This is the tendency of the knee to collapse inward during a flexion movement, like a lunge or landing a jump. It’s not just an aesthetic flaw; it’s the primary injury mechanism for the anterior cruciate ligament (ACL), especially feared in popular Canadian sports like skiing, basketball, or hockey.
Analyzing Dynamic Valgus: A Symptom, Not a Cause
Sports injury analysis reveals that knee valgus is rarely an isolated problem. It is a glaring symptom of weakness in the hip stabilizers, particularly the gluteus medius. This muscle, located on the side of the hip, is supposed to prevent the femur from rotating inward. When it’s weak, the adductors (inner thigh) take over and pull the knee inward. The knee simply suffers from the lack of control originating from the joint above.
The most insidious part is that this movement can be minimal and go unnoticed without close observation. Fortunately, there is a simple test to self-diagnose it. Stand in front of a mirror, lift one leg, and perform a slight bend on the supporting leg (a single-leg mini-lunge). Watch your knee. If it clearly deviates inward, even slightly, it’s a sign that your gluteus medius isn’t doing its job. The priority then is no longer just the lunge, but targeted strengthening of this crucial stabilizer muscle (using exercises like side planks or hip abductions).
Key Takeaways
- The reverse lunge is biomechanically safer for fragile knees because it offloads the kneecap by favoring hip work.
- Stability depends on foot proprioception (tripod support) and conscious glute activation, not brute strength.
- Knee valgus (knee caving in) is a sign of weakness in the hip stabilizers (glute medius) that must be corrected as a priority.
Minimalist vs. cushioned shoes: which ones truly protect your knees?
The kinetic chain starts at the ground. Your choice of running or hiking shoes is therefore not a detail, but the first link that influences your body’s entire alignment. The debate between maximalist shoes, with heavy cushioning, and minimalist shoes, which promote a more natural stride, is intense. For the knee, the answer isn’t clear-cut and depends on your personal biomechanics.
Comparative Study: The Impact of Shoes on Injuries
A randomized study conducted by The Running Clinic (La Clinique du Coureur), a Quebec authority on runner health, compared injury rates between runners using traditional shoes and those transitioning to minimalist shoes. The results are nuanced: the minimalist group reported fewer knee, hip, and lower back pains in the long term. However, they experienced more calf and shin pain initially. The conclusion is that while minimalist shoes can reduce impact forces on the knee, the transition must be extremely progressive (for example, 10 more minutes per week over 12 weeks) to allow foot and calf tissues to adapt.
Cushioned shoes can provide a false sense of security, encouraging an aggressive heel strike that sends a shockwave directly into the knee. In contrast, minimalist shoes favor a flatter foot strike, better utilizing the body’s natural cushioning. Indeed, research indicates that minimalist shoes allow for a 40% reduction in the angle of dorsiflexion at impact, reducing the lever arm and stress on the knee joint. However, this approach requires much stronger feet and calves.
The choice isn’t between “good” and “bad,” but between two philosophies that require different adaptations. If you suffer from knee pain, a very slow and controlled transition to a shoe with less cushioning and a lower drop could be a winning strategy, provided it is accompanied by specific foot and calf strengthening.
How to do Mountain Climbers without slipping or hurting your lower back?
A strong and resilient kinetic chain needs a solid center. Strengthening your legs with perfectly executed lunges is one thing, but if your core is weak, imbalances will return. The Mountain Climber is an excellent complementary exercise because it challenges core stability in a dynamic plane, simulating the dissociation needed for running. However, if poorly executed, it can quickly cause lower back pain.
The most frequent error is a lack of pelvic stability and letting the back arch. This reduces effectiveness for the abdominals and can lead to unnecessary strain on the lower back.
– Experts from My15MinuteChallenge, Mountain Climber Guide 2025
The secret to a safe and effective Mountain Climber is to view it not as a speed exercise, but as a dynamic plank. The absolute priority is to maintain perfect body alignment from shoulders to heels, actively engaging the deep abdominals to prevent the pelvis from tilting or the back from arching. Speed is a progression, not a prerequisite.
To master the movement and reap all its benefits without risk, follow this technical protocol:
- Transverse Abdominal Activation: Before starting, in the plank position, lightly pull your belly button toward your spine. This is the “lock” of your core bracing.
- Stable Starting Position: Place yourself in a high plank, hands directly under shoulders, body forming a straight line. Spread your feet slightly for more stability at first.
- Slow and Controlled Movement: Start by bringing one knee toward your chest very slowly, focusing solely on maintaining pelvic stability. Nothing else should move. Return the foot and alternate.
- Progression through Duration, then Speed: First master the exercise for 20 to 30-second periods at a slow pace. Once form is perfect and the back doesn’t move, you can increase duration, and only then, speed.
- Continuous Breathing: Never hold your breath. Inhale and exhale regularly to oxygenate your muscles and maintain abdominal tension.
Now that you have the complete protocol, the next step is to apply it progressively and intelligently. Start by self-assessing with the knee valgus test, then integrate slow-tempo static reverse lunges into your routine, focusing on every technical detail. Only through patience and movement perfection will you build knees that are proofed against the trails and the miles.
Frequently Asked Questions about Lunges and Knee Protection
Why do my knees cave inward during lunges?
This phenomenon, called dynamic valgus, usually indicates weakness in the gluteus medius and external rotators of the hip. The inner thigh muscles (adductors) then take over, creating this movement which is dangerous for knee ligaments. The solution is targeted strengthening of the muscles on the side of the hip.
How do I know if I have a hip muscle imbalance?
Perform a single-leg bend (single-leg lunge) in front of a mirror. If your knee deviates inward or if your pelvis drops to one side, it is very likely you have a stabilizer imbalance at the hip that needs correcting.
How long does it take to correct knee valgus?
Correction depends on consistency and the quality of training. With a targeted strengthening program for the gluteus medius and proprioception exercises (like balance work), significant improvement in motor control can be observed within 6 to 8 weeks of diligent training.